_edited.jpg)


Growing Native Plants
from Seed
It is surprisingly easy and low-cost to grow your own native pollinator garden from seed, though there are a few things you need to know.
To learn about seed collection, check out this page.
Many native plants need a period of cold weather to germinate in spring.
Therefore, some seeds need to be stratified. But the good news is that if you are too late or in an environment, e.g. a school, where stratification is too inconvenient, many species will germinate without stratification.
There are different ways to stratify seeds:
Let winter do it naturally through outdoor cold-moist-stratification
or mimic conditions in your fridge.
Check out the advantages of 4 different methods and the exact steps to successfully grow native plants from seed.
(But of course, there are as many different methods as there are people on the planet :-)
Which of these Methods Work For You?

1. The Natural Method:
Sow in Fall and Winter

2. "Wintersowing"
Mini-Greenhouse-Method
Heading 2

3. Sow in Spring after
Cold-Moist-Stratification

4. Grow Indoors on a Window Sill
Advantages and Disadvantages of the Different Methods

We highly recommend the natural method as the go-to method and only complement it with other methods for specific needs
Seeds are sown outdoors between November and February, and stratify naturally
+ This process grows native plants in a way that mimics nature. Humans are just scratching the surface of comprehending how interconnected all natural processes are. Long-term success for plants grown in this way should be the greatest.
+ New research found that the longer the stratification period for the seeds is, the greater the genetic diversity in the seedlings, which dramatically enhances biodiversity and resilience to climate change.
+ Straightforward process: collect the seeds, sow them and forget about them until the end of March.
+ No need for Ziploc plastic bags.
+ Takes no space in the fridge.
- Unwanted seeds are still plentiful in the fall and can fly into pots.
- Small-holed mesh is required to keep mice and birds from eating the seeds.
- Since spring is far away, it is paramount that every pot has a label written with a very durable pen or with a pencil, especially because the pots will need to be moved from the shade to part sun.

Great for school projects, vegetables,
moisture-loving plants and tiny seeds
2. "Wintersowing"
Sow in a Mini Greenhouse in Winter
Seeds are sown between the 21st of December and February and stratify throughout winter
+ A continuously moist environment, through condensation and water recycling, benefits moisture-loving plants that are otherwise finicky to get to the seedling stage.
+ Great for tiny seeds that need light to germinate since they can be safely surface-sown and stratify naturally. When stratifying tiny seeds in the fridge, it's better to stratify them in moist sand, since they are hard to remove from a paper towel.
+ No extra protection against mice, squirrels, and birds eating the seeds is needed.
+ Great for school seed-sowing projects.
+ Almost no unwanted seeds will get into the pots; great control over what you grow.
+ No bags with seeds for stratification in the fridge.
+ Only sporadic checks on the seeds/seedlings are necessary until March.
+ Plants germinate earlier in spring and develop more quickly. This is a real advantage for annuals and vegetables.
- Plastic containers with the matching lid need to be collected.
- Time-consuming to put the setup together.
- Might promote pathogens on usually hardy plants through the consistent presence of moisture.

Feels so good to get out in the garden
Sow recently obtained seeds
Grow more, more, more-
Grow the seeds you forgot
Sow seeds between March and May, and stratify them in the fridge
- Seeds need to be stratified in plastic bags in the fridge.
- The process requires some planning since different species require different periods of stratification.
- Even professionals like nurseries and governments don't agree on the required stratification time.
- Seeds might start germinating in the fridge, which makes it difficult to sow them.
- Protection against squirrels is needed.
+ Hardly any unwanted seeds are still flying around, so most seedlings will be the sown ones, which makes it a very successful process.
+ It feels so good to get gardening when warmer days become pleasant.
+ Plants germinate very soon after sowing, which makes it a continuous process.
+ Gardening in spring fits within Western gardening traditions; therefore, it feels right, and it makes it easier to get people excited to get sowing.
+ Seeds obtained in spring can still be sown.

Great for schools
Observe the seedlings grow right in the classroom
Seeds are sown between March and May and stratified in the fridge
- This is quite an unnatural process, and hardening off might be needed.
- Seeds need to be stratified in plastic bags in the fridge.
- The process requires some planning since different species require different periods of stratification.
+ No protection against squirrels is needed.
+ No outside seeds, complete control over what will grow.
+ Plants germinate very soon after sowing and grow very fast.
+ Since the seedlings grow indoors, they can be easily observed.
+ Makes for a great project for schools

1. HOW TO SOW IN FALL/WINTER
THE VERY EASY WAY
Seeds will stratify naturally going through the winter outdoors

From November until the beginning of February
Fill containers with well-moistened potting soil.
Sow the seeds on top and gently press them onto the soil so they have contact with the soil. If the seeds need light to germinate, don't add soil on top. Otherwise, sprinkle a bit of soil or coarse sand on top.
Label each pot with the plant's name and source. Adding the source information enables you to support genetic diversity in a planting. Add all other information that could be important for you.
Put the pots in a shaded location that receives rain and snow, and keep them far from stems with seed heads to avoid seeds blowing into the pots.
After Sowing
To give extra protection, cover the pots with a layer of leaves.
Protect from squirrels, birds, and mice by covering the pots with a fine mesh and tucking it under the pots. If you don't protect the seeds, none might be left by spring unless you grow them on a balcony.
You will not have to look after your seeds until the weather gets warmer.

March to May
When the days get warmer, remove the leaves and move the pots into a part-sunny location.
Seeds will germinate at very different rates depending on the species. From that point onwards, the seedlings can never dry out.
Seedlings are ready to be planted in the soil in the summer, no later than September, but can be overwintered in their pots.

The following Sections apply to all Methods
How to Up-Pot


The seedlings start to outgrow their container
in May or June. If they don't get up-potted, they will not grow any further.
Very carefully divide them into chunks, so as not to damage the roots too much.
Plant them in a clump in the middle of a 10 cm or larger pot, in fresh potting soil.
The seedlings start to outgrow their container in May.
Very carefully divide them into chunks not to damage the roots too much.
Put them as a clump in the middle of a 10 cm or bigger pot with fresh potting soil.


The seedlings have reached their maximum growth in this container and will not grow further unless up-potted.
This is a mixed pot with giant yellow hyssop, purple coneflower, blazing star and asters. It got up-potted into 8 small pots.
After up-potting, all seedlings have enough space to start their next growth spurt. The timing of up-potting greatly determines how well the seedlings can grow and how quickly they will be ready to be planted into the landscape.
After up-potting, water the seedlings well. It is a good idea to keep them in a bucket where they can soak up water for several hours. Then keep them in the shade for a few days until they have recovered. When they look happy again, you can put them back into a part-sun location.
Ready to Be Planted
Most Plants Will Be Ready To Be Planted By Mid-Summer
It is essential to match the plant to the conditions of a location so it can thrive.
Even drought-tolerant plants need frequent watering until their root systems are well established.

More Details on

2. HOW TO WINTERSOW
THE VERY CONTROLLED WAY
Seeds will naturally stratify outdoors
Winter sowing is a fun method that uses mini-greenhouses to speed up the growth of plants. The plants will be abundant, lush, and ready for transplanting in summer.
You can find a detailed video by Dolly Foster, a Master Gardener, on Wintersowing.
Here are the simple steps:

From December 21st to the Beginning of February
Sow seeds onto moist soil in a deep container to support vigorous root growth.
Label inside and outside with a very durable garden marker or a pencil.
Water the soil so that it is well moistened but not wet. If you have, add some snow on top.
Tape the lid onto the matching bottom.

During Winter
Keep containers in a shaded spot or one that doesn't receive midday sun so the little greenhouse doesn't heat up to extreme temperatures.
That's all you need to do until temperatures warm up.
It is very unlikely that the soil dries out. You can check periodically if you are worried.

Starting in March
Place containers in a partially sunny location. On warmer days, open the lid and only close it at night.
Once the last danger of frost has passed and day and nighttime temperatures get warmer, remove the lid altogether. You might need other protection if the seedlings have not completely covered the soil.
Seedlings will soon have to be up-potted and transplanted into the gardens.
3. HOW TO SOW IN SPRING
THE CONTROLLED WAY
Seeds must have been stratified either in the fridge or just been collected from the plant before sowing

STRATIFY SEEDS FOR
SPRING SOWING
The following explains the basics of the cold-moist-stratification method in the fridge. It will work for many popular pollinator plants with seeds that require a cold, moist period to break dormancy. To propagate woodland plants, shrubs, and plants that require different stratification, consult wildplantsfromseed.com or, for even more detailed information, check out the instructions from the USDA.
Storage
From Harvest until Cold Moist Stratification

Keep the seeds in paper envelopes labelled with the plant name, location, and date of harvest until you start the stratification process. This is around mid-February for most plants.
For the exact length of the required stratification period and the method, see Prairie Moon Nursery's website.
To figure out when to put the seeds in the fridge, count back the days of required cold- moist stratification from the day you want to plant. As long as the seeds haven't germinated in the fridge yet, you can sow them outside at any time, regardless of the last frost date. Native plant seeds have evolved in our climate.
Stratification
Starting any time in January, until April Depending on the required time to stratify

To stratify the seeds, transfer them onto a moist paper towel.
Fold the paper towel in half or into quarters, then put it into a Ziploc bag.
Close the bag tightly.
Label with name, location, and start date of stratification. For ease of use, you can add the needed CMS days or the date when seeds are ready to be planted.
It also helps to add the planting dates to a calendar.
Keep the bag in the fridge until you sow the seeds outside.
To reduce plastic waste, add multiple seed species to a bag by rolling the towel after folding it. Then place a sticker on top of each species.

Sowing
From March until May
Fill containers with very well-pre-moistened potting soil.
Sow the stratified seeds on top, then gently press them onto the soil to make contact with the soil. Sprinkle some soil or coarse sand on top if the seeds don't require light to germinate.
Water well.
Label each pot with the plant's name and, if you know it, its source to support genetic diversity in a planting.
Place in a part-sun location and ensure the soil never dries out.

After Sowing
Protect from squirrels, birds, and mice by covering the pots with a fine-mesh cover and tucking it under the pots to secure it.
The seeds will germinate at very different rates depending on their species. Once the seeds have sprouted, it is imperative never to let the seedlings dry out.
Most seedlings don't like the stress of a full-sun location and prefer to be located in part sun.
Picture: This box of butterfly weed seedlings already fed 5 monarch caterpillars as small seedlings ;-)

April to August
By June, most seedlings must be up-potted, divided and planted into bigger pots to allow rapid growth.
Usually, about one month after up-potting, the seedlings are ready to be planted into the soil, ideally by mid-summer.
The seedlings can further be up-potted, if needed, later in the year and planted out until the end of September.
They can also be overwintered in their pots in a sheltered place outdoors and planted in spring.
THE DETAILS
Containers & Soil
Any container at least 5 cm /2 inches deep can be used.
Cut holes into the bottom of the container if it doesn't have drainage holes.
Any potting soil is sufficient. There is no need to buy seed-starting mix, but finer potting soil works better.
Most soil comes rather dry. To save time, you can pour a good amount of water into the opened bag and let the soil absorb it for a few hours. The soil needs to be evenly moist before sowing.
Fill containers and tap them to settle the soil until they are almost full.
Leave about half a centimetre from the top.
Sowing Your Seeds
Put seeds in the palm of one hand, pick the seeds you will sow, and sprinkle them as evenly as possible onto the soil.
Very gently press them onto the soil, then add a dusting of soil or coarse sand on top. As a rule of thumb, seeds should get covered with soil about their own thickness. Smaller seeds often need light to germinate and should just be sown on the surface.
Water gently to settle the seeds, or add snow on top. Watering can be done with a spray bottle.
It is helpful to mark each container with the plant's name and its origin. This enables you to grow plants of the same species from different sources together, in your garden, creating a more diverse and resilient gene pool through cross-pollination.
Cut-up yogurt containers work very well to create your own tags.
For detailed instructions on how to sow, check out Heather McCargo's short video.
Protection
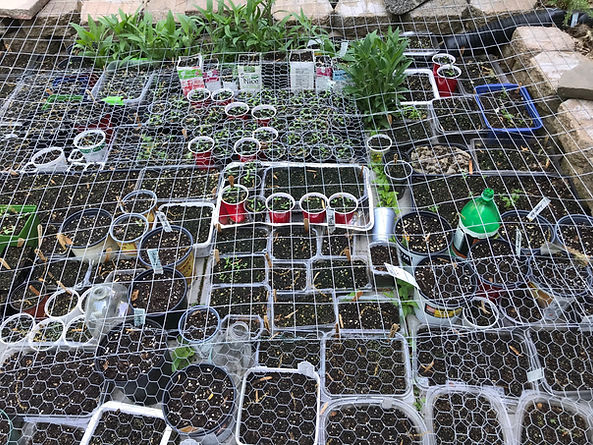
It is important to protect the pots so that squirrels can't dig up the soil and destroy the seeds or seedlings, or that birds can't eat the seeds.
The easiest is to use sturdy plastic netting.
Chicken wire is a method that works very well, but working with chicken wire is quite unpleasant unless you build a cage that you can use for years.
Covering the soil and seeds with some leaves is a good idea since birds can still pick through the net and eat the seeds, and it also protects the soil as a living system.
It is surprising how effectively simple plastic bags prevent squirrels from digging. Be aware that this method creates a greenhouse effect, providing a warm, moist environment. Germination will most likely happen earlier than without this protection. If you build a structure for the seedlings to grow in, you can leave a clear bag on it until the end of May. You've created a simple greenhouse. As the evaporating water condenses and drips back into the soil, watering needs are reduced to a minimum. In that case, make sure the pots are in part-sun only, not in the strong midday sun.
See-through containers with matching bottoms from kitchen recycling can also be turned into squirrel-proof greenhouses.
Most native plants don't need a head start given by a greenhouse. It is an excellent method for annual herbs that support butterflies, like fennel and dill.
By the end of May, it is best to remove the plastic, as a moist environment favours mould growth.

Caring for Your Seedlings
Seeds germinate at their own pace depending on species, daytime and nighttime temperatures, moisture, and light conditions.
Once the seeds have germinated, they can never dry out. From now on, check the soil daily to see if it needs watering.
Once the seedlings have their second set of true leaves (cotyledons are the very first leaves, which often don't look like the plant's leaves), and they start to get crowded, it is time to up-pot. Divide them into roughly square-inch pieces and place them in the middle of a larger pot, as one piece. This way, the roots don't get too damaged, and the plants have space to move outwards.
Since potting soil already contains fertilizer and most native plants don't do well in very rich soil, there is no need to add fertilizer at any time.
Some Useful Tips
-
Potting soil consists mainly of peat moss. To avoid destroying our ecologically important peatlands, experiment with alternative growing media, such as homemade compost and leaf mould.
-
You can reuse and recharge old potting soil by adding one-third of compost.
-
Smaller containers dry out faster, so frequent watering becomes essential. Bigger containers, like old window boxes or large plastic containers for fruits and vegetables, hold more moisture, make watering a bit easier, and let plants grow faster and larger.
-
Almost all seedlings grow better in partial shade than in full sun. Seedlings in the wild will grow in the protective shade of mature plants.
-
The right timing of up-potting and planting out will significantly determine the success of the plants. Dividing the seedlings and getting them into bigger pots usually starts at the end of June, with planting the young plants in the soil around August.
Heather McCargo, the founder of the Wild Seed Project, is an excellent resource for learning more about growing native plants from seed.
She has decades of experience with a wide variety of native plants, methods and soils. The featured talk will carry you off into the wonderful world of growing your own native plants from seed and contributing to the creation of genetically diverse seedlings.

Toronto Based Resources
Pete Ewins shares his experience collecting seeds and growing native plants in his Toronto backyard.
Local seed exchanges are organized by


Prairiemoon.com is a great resource to double-check growing requirements

A huge thank you to Kristl Walek and Graham Page for cracking hundreds of germination codes of woodland plants, shrubs, trees and difficult-to-grow plants and for sharing them with us @ wildplantsfromseed.com.
